Shoulder Stand
How to Perform Salamba Sarvangasana
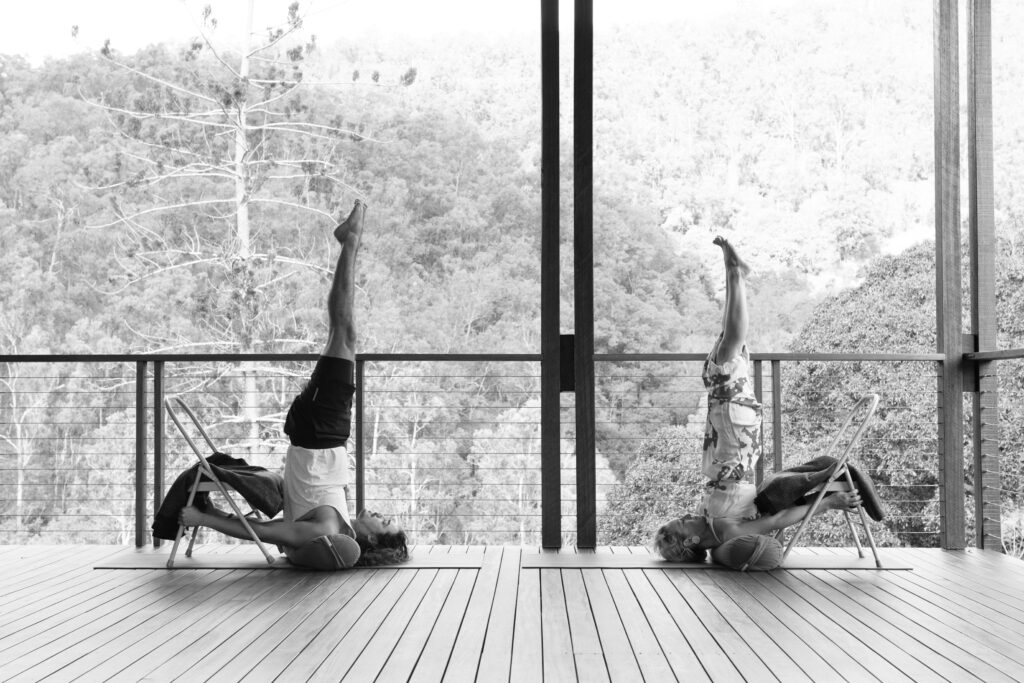
1. Take four to six blankets in four-fold rectangles. Place them on top of each other. If required, you can put a sticky mat on the blanket so that your upper arms are held in place while you are in the pose. Lie on the blankets with your shoulders placed parallel to one of the greater edges of the blankets and supported by the blankets. Your head should be placed on the ground. Put your hands on the floor beside your body, bend your knees, place your feet against the ground, and take the heels as close as possible to the sitting bones. During exhalation, push your arms against the ground and take your feet away from the ground, drawing your thighs into the front side of your body.
2. Continue to pull up by moving the pelvis and then the back of the body away from the ground, such that your knees are moved in the direction of your face. Lengthen your arms outwards, keeping them parallel to the edge of the blanket and moving them outward so that the fingers are pushed against the ground and the thumbs pointing behind you. Bend your elbows and move them towards each other. Place the back of your upper arms on the blankets and put your palms against the back of your body. Draw up the pelvis towards the shoulders, placing the body now at a right angle to the floor. Move your hands as far down your back as possible, and then gently move the black flesh upwards with your hands, keeping your elbows at shoulder distance apart.
3. During inhalation, pull up your bent knees toward the ceiling and move your thighs in line with your body and your heels hanging down by your buttocks. Push your tailbone toward the pubis and move the upper thighs slightly inwards. Finally, stretch the knees and press the heels upwards toward the ceiling during inhalation. In the position of fully stretched legs, pull up the balls of the big toes so that the inner legs become slighter longer than the outer legs.
4. Make your throat and tongue soft. Press the shoulder blades firmly against your back and pull your sternum toward your chin. In this position, your forehead should lie parallel to the ground, and your chin should be perpendicular to the ground. Push the back of your upper arms and the top portion of your shoulders actively into the support of blankets and try to pull up the upper portion of the spine away from the ground. Focus your gaze softly on your chest.
5. Beginners should hold themselves in the pose for around 30 seconds. You should gradually stay for 5-10 seconds more every day until you can stay in the pose for 3 minutes comfortably. Then stay for 3 minutes in the pose for a couple of weeks until you can comfortably hold the pose. Again gradually increase your stay for 5-10 seconds every day until you are able to stay in the pose for 5 minutes comfortably. Exhale; bend your knees into the body, and move slowly and carefully the back of your body on the ground while keeping the back of your head on the ground.
Salamba Sarvangasana Benefits
Western Physiology
Salamba Sarvangasana has a therapeutic effect on mental and physical health.
- Salamba Sarvangasana improves mental health:
- It helps in calming and relaxing the brain.
- It helps in relieving the symptoms associated with stress and mild depression (Evans et al., 2013).
- Salamba Sarvangasana stretches and strengthens the muscles:
- It stretches the neck and shoulders.
- It helps in relieving the symptoms of insomnia.
- It helps in toning the buttocks and legs.
- Other therapeutic effects of Salamba Sarvangasana include but are not limited to:
- It increases the flexibility and mobility of the body (Grabara & Szopa, 2015).
- It helps stimulate the prostate gland, thyroid gland, and the organs in the abdominal region.
- It helps in improving digestion.
- It helps in relieving the symptoms associated with menopause.
- It helps in relieving symptoms of fatigue (Evans et al., 2013).
- It has therapeutic benefits for people with sinusitis, asthma and infertility, rheumatoid arthritis, and irritable bowel syndrome (Evans et al., 2013; Evans et al., 2014).
Yogic Physiology
This posture is part of the viparita family, where the body is turned upside down and this is said to offer the opposite psychological perspective. It helps us face fears and see the world differently.
It strongly works the marma points of the neck, particularly krikatika marmas, which support prana through the back of head and neck. Sira Matrika marmas are located at the front of the neck over the major blood vessels and are gently squeezed through this posture affecting flow of udana vayu to this region. Vidhura marma underneath the earlobe will also have pressure applied in this posture and will assist in bringing prana to the head, ears and jaw. They are very good marma points for ear conditions.
Chinese Medicine
Stretching into the back lines of the body, it affects the kidney and bladder meridian lines and also the governor vessel meridian line, associated with sushumna nadi in yoga.
Contradictions and Cautions
- Individuals suffering from diarrhea, headache and high blood pressure should avoid performing this pose.
- Females should not do this pose during menstruation.
- You should also avoid this pose if you are suffering from any type of neck or head injury or have balancing difficulties.
Preparatory Asanas
- Halasana
- Setu Bandha Sarvangasana
- Virasana
Tips for Beginners
The elbows of the beginners tend to flare out to the sides and their shoulders to twist inward, which causes the torso to drop onto the upper back, ruining the posture (and potentially straining the neck). Before you lie down on the blanket support, roll up a sticky mat and place it on the support so that its long axis is parallel to the back edge (the edge opposite the shoulder edge). Then rise up by raising your elbows and securing them with a sticky mat.
Variations
Eka Pada Sarvangasana is one of the simplest Sarvangasana variations. Get into a pose. Lock the left leg perpendicular to the floor, then exhale and lower the right leg parallel to the ground without disturbing the position of the left. The outer thigh of the lower leg (in this case, the right one) tends to sink towards the floor. To correct this, rotate your right leg outward, moving your sitting bone to the left. Hold the two sitting bones together and rotate (from the hip joint only) the right leg back to the neutral position. Hold for 10-30 seconds, inhale with the right leg, returning to a perpendicular position, and repeat the same with the left for the same period of time.
Modifications and Props
Rolling into Sarvangasana from the floor can be difficult at first. You can use the wall to help you get into the pose. Spread the blankets a foot from the wall (this distance depends on your height: taller practitioners will be further from the wall, shorter ones closer). Sit sideways on support (one side against the wall) and, as you exhale, continue by lowering your shoulders on the edge of the blanket and your feet against the wall. Bend your knees at a right angle, rest your feet on the wall and tear your pelvis off the support. When your trunk and hips are perpendicular to the floor, lift your legs off the wall and complete the pose. To lower yourself, exhale your legs back against the wall and slide down.
Deepen the Asana
In this pose, students usually press only the sides of the index fingers to the back. Make sure both palms are wide apart at the back of your trunk. Press on the back ribs, especially with the ring and little fingers. Periodically move your hands away from your back, pull your shoulder blades together, and bring your hands back a little closer to your head than before.
Use bolsters to balance on rather than blankets. It makes the posture more difficult!
Further Contraindications and Cautions
Caution during pregnancy: If you have been doing this pose and are experienced in doing this, then you can continue performing this pose into the late months of pregnancy. However, you should not try this pose after you have become pregnant if you are a novice.
This pose is regarded as an intermediate to advance on the difficulty level. You should not perform this pose if you do not have sufficient prior experience or unless you are doing it under the supervision of an experienced yoga trainer.
References
Evans S, Moieni M, Lung K, Tsao J, Sternlieb B, Taylor M, Zeltzer L. Impact of iyengar yoga on quality of life in young women with rheumatoid arthritis. Clin J Pain. 2013 Nov;29(11):988-97. doi: 10.1097/AJP.0b013e31827da381. PMID: 23370082; PMCID: PMC3644391.
Grabara M, Szopa J. Effects of hatha yoga exercises on spine flexibility in women over 50 years old. J Phys Ther Sci. 2015 Feb;27(2):361-5. doi: 10.1589/jpts.27.361
Evans S, Lung KC, Seidman LC, Sternlieb B, Zeltzer LK, Tsao JC. Iyengar yoga for adolescents and young adults with irritable bowel syndrome. J Pediatr Gastroenterol Nutr. 2014 Aug;59(2):244-53. doi: 10.1097/MPG.0000000000000366.
If you would like to contact Celia to learn more about the meditation teacher training journey, please do visit our Meditation Teacher Training Page or find us on Facebook or Instagram or contact Celia directly.