The word Hanumanasana comes from the name of the Hindu god Hanuman. Lord Hanuman was a powerful monkey chief and a devoted servant of Lord Rama in the Hindu religion. The pose may also be called the “Monkey Pose”.
How to perform Hanumanasana
1. Begin by kneeling on the ground.
2. Place your palms about one foot apart on the ground on either side of your body.
3. Lifting your knees upwards, move your right leg in the forward direction and your left leg in the backward direction. During an exhalation, try to extend both your legs, keeping them straight and placing your hips up from the floor. Then press your hips and legs to the floor and transfer your body weight to your hands.
4. It may take a long time to practice this pose and master it. It would be best if you practised it daily by making several daily attempts to rest your legs straight on the ground with hips touching the floor. In this position, the back of the front leg and the front of the back leg eventually aim to touch the ground.
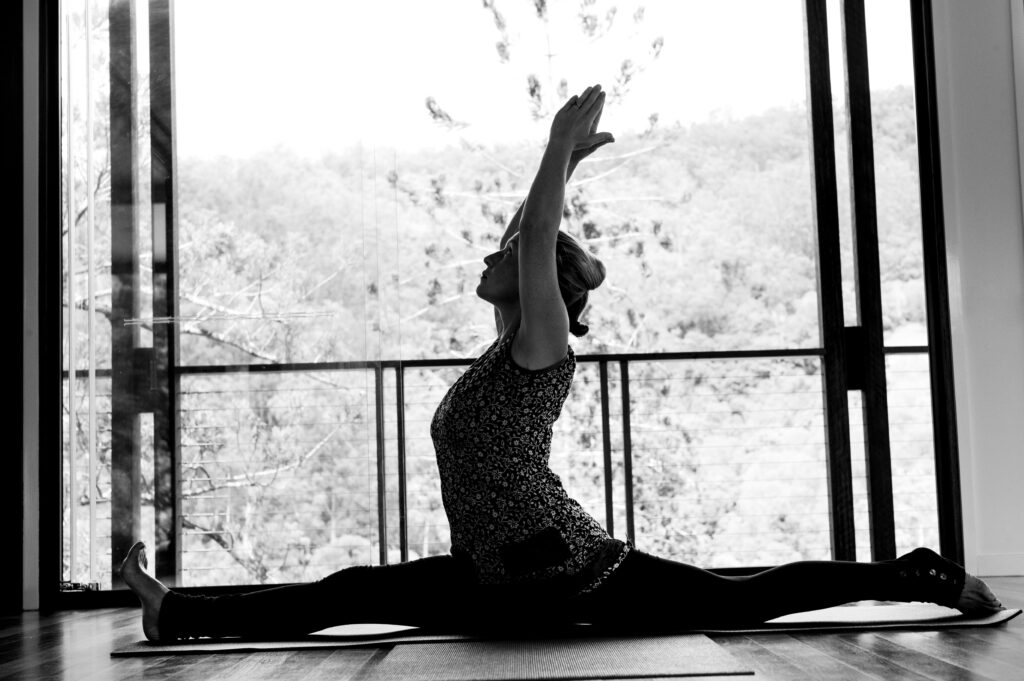
5. Once you can get into a straight-legged position, sit on the ground, raise your arms and place them in Namaskara Mudra in front of your chest and balance your body. Hold in this pose for 15-30 seconds and breathe normally.
6. Using your hands, raise your hips and reverse the legs. Move the left leg in front and dorsiflex the toes (ha-pada bandha). This means moving the toes backwards towards the knee joint into a foot lock. Place the right leg behind and press it into the floor with the little toe if this is comfortable for the back knee. Repeat the pose for the same duration of time.
7. Make sure the back of the knee joints of both legs are touching the ground if you have no knee injuries or pain.
8. In advanced stages, you may raise your hands upwards above your head, stretch them and put your palms together. Maintain the balance of your body in this position. This position stretches the legs more and helps in relieving the strain on the back muscles.
Hanumanasana Benefits
Western Physiology
Hanumanasana has a therapeutic effect on physical health.
- Hanumanasana stretches and strengthens the muscles:
- This pose helps improve muscle strength, endurance, flexibility, and agility (G. Kalpana & Department, 2020).
- It helps in toning the muscles of the leg.
- This pose helps prevent leg and hip injury (Balayogi Bhavanani, Ananda Dr., Bhavanani, 2001).
- It helps in relaxing and strengthening the abductor muscles of the thighs.
- It keeps the legs in good and fit condition and is a recommended pose for runners and sprinters.
- Regular practice of this pose in tandem with others may benefit patients with peptic ulcer (Jogdand, 2000).
- Other therapeutic effects of Hanumanasana include but are not limited to:
- It helps in relieving the symptoms of mild sciatica.
- This pose, amongst others, benefits the cardiovascular system. It can decrease systolic blood pressure, mean arterial pressure, and heart rate (Satyanarayana, 2013).
- This pose, in combination with others, can reduce BMI. (Satyanarayana, 2013).
Yogic Physiology
This posture works the marma points that correspond with the lymph nodes of the hips and armpits. In both locations, the four marma points are called Lohitaksha and massage the lymph and assist in circulation. The posture also works vyana vayu (circulation of prana to the legs and arms) and apana vayu (the downward movement of prana).
Chinese Medicine
The arms and corresponding heart meridian lines are engaged in full posture with the arms lifted. The kidney and bladder meridians on the back of the legs are also stretched in this posture.
Contradictions and Cautions
Individuals suffering from groyne or hamstring injuries should avoid this pose. Be very careful with your knees. Bend them if needed. To avoid straining tendons and ligaments of knee and hamstring, pull the heels back towards the sit bones to resist your full range. This eventually will develop hamstring extensibility and better range in the longer term.
If you have mild sciatica and still wish to perform the pose, note how it feels to point the front toes (tha-pada bandha) instead of dorsiflex the front foot (ha-pada bandha). This is similar to milking the nerve or flossing the nerve, which can also be performed in the front leg whilst performing the pose for the advanced practitioner.
Preparatory Asanas
- Baddha Konasana
- Janu Sirsasana
- Paschimottanasana
- Prasarita Padottanasana
- Supta Virasana
- Supta Baddha Konasana
- Supta Padangusthasana
- Upavistha Konasana
- Urdhva Prasarita Padasana
- Uttanasana
- Virasana
Follow up Asanas
- Eka Pada Rajakapotasana
- Natarajasana
- Paschimottanasana
- Upavistha Konasana
Tips for Beginners
To increase the length of the torso and spine, press the back foot actively into the floor with the little toe and, from this pressure, lift the shoulder blades firmly into your back and lift both sides of the torso from the hips.
Variations
From the position described in step 4 above, lean your torso forward, bend over your front leg and hold your foot with your hands. Hold for 10-15 seconds, then come up on an inhalation.
Modifications and Props
Students just beginning to learn this pose are often unable to get the legs and pelvis down to the floor, which is usually due to some restriction in the backs of the legs or front groins. While in the starting leg position (as described in step 1 above), place a thick bolster below the pelvis (with its long axis parallel to your inner legs). Straightening your legs, slowly lower your pelvis onto the bolster. Add a tightly folded blanket or a second bolster if the bolster is not thick enough to support the pelvis comfortably.
Deepen the Asana
The arms are raised overhead from the movement of the lower back ribs. Pull your back ribs away from the top of your pelvis and use this to bring your arms closer to the ceiling. Lengthen along the backs of the arms, stretching your little fingers closer to the ceiling than the index fingers. Then, pin the fingertips against the ceiling and release or “hang” the ribs from the arms. Yo-yo the ribs between the arms and the pelvis: relative to the pelvis, the ribs lift, boosting the arms closer to the ceiling; relative to the arms, the ribs drop toward the floor, increasing the deep stretch in the armpits and pressure on lymph nodes under the arms. This pose will also increase the squeezing pressure on the lymph nodes in the hips and is therefore wonderful for the lymphatic system and flow of lymph.
References
G. Kalpana, & Department. (2020). Effects of 4-Week Yoga Training on Muscular Strength, Muscular Endurance, Flexibility, and Agility of Female Hockey Players. International Conference on Enhancing Skills in Physical Education and Sport Science, 635–637.
Balayogi Bhavanani, Ananda Dr., Bhavanani, D. (2001). Bharatanatyam and yoga. Yoganjali Natyalayam, Pondicherry, 1–17.
Satyanarayana, P. (2013). Effect of Yoga on Heart Rate, Blood Pressure, Body Mass Index. IOSR Journal of Dental and Medical Sciences, 8(2), 36–39. https://doi.org/10.9790/0853-0823639
Jogdand, S. B. Role of yoga therapy in peptic ulcer: A case study. In H. R. Nagendra, R. Ragarathna, and S. Telles, Yoga Research & Applications: Proceedings of the 5th International Conference on Frontiers in Yoga Research and Applications. Bangalore, Vivekananda Kendra Yoga Research Foundation, 2000, pp. 233-234.
If you would like to contact Celia to learn more about the meditation teacher training journey, please do visit our Meditation Teacher Training Page or find us on Facebook or Instagram or contact Celia directly.